Page 1 of 1
Perferated Sheet-How To
Posted: Thu Jul 08, 2021 5:03 pm
by JustinP
Hey all,
Maybe my work PC is a touch weak, but I need to make a perferated sheet 4ft*10ft* with a 1" border, using .375" SQ. holes on .625" spacing. Square pattern.
Ive tried a number of things but it just brings my PC to its knees. I have tried:
Feature; Fill pattern. (Awesome control)
sketch; Linear Pattern. (hole lotta nope)
Assembly; Pattern cubes for the holes and combine cubes with plate and subtract. (Works best, less control)
Is there any other ways to do this? any sneaky tricks or work-arounds? (dont know why we call em work-arounds if we spend most of our time doing it that way)
![Image]()
Thanks Guys, Justin

Re: Perferated Sheet-How To
Posted: Thu Jul 08, 2021 6:06 pm
by MJuric
If you can't get away with doing a representation of the grid, corners only, decal etc etc and you have to have the actual pattern, I've found the best way is to break it up into smaller chunks.
So for instance in this case if you were looking at 74 across and 189 down I might do a cut and then pattern that 37 X 21. Do another cut in the right spot and do another pattern of 37 X 21.
I'm sure someone will come up with something but I've not seen a great answer to this. Once any single array gets over a certain number it just brings SW to it's knees. However if you do a bunch of smaller arrays that end up being the same number of items it seems to be fine with it.
At one time I thought I used a trick of arraying the bodies and subtracting those from another body....just tried it and SW puked in the same way.
Re: Perferated Sheet-How To
Posted: Thu Jul 08, 2021 8:08 pm
by JustinP
That trick you mentioned, try an assembly freature pattern and combine with subtract. thats how I normally do my patterns but this particular cutomer wanted the pattern to originate out from the center, like a fill pattern would do. Face palm
Re: Perferated Sheet-How To
Posted: Thu Jul 08, 2021 11:37 pm
by jcapriotti
JustinP wrote: ↑Thu Jul 08, 2021 8:08 pm
That trick you mentioned, try an assembly freature pattern and combine with subtract. thats how I normally do my patterns but this particular cutomer wanted the pattern to originate out from the center, like a fill pattern would do. Face palm
All CAD systems choke on this, SolidWorks handles it better than most but eventually you just have too many holes. Does your customer plan to fabricate this from the model?
On my PC, it took 30 minutes to generate a fill pattern. Do much of anything can lock the software
The fill pattern uses an sketch offset 1" from the perimeter of the part. I checked "Geometry Pattern", not sure if that makes a difference here though as the seed feature is a square from inside the Fill Pattern. 13797 pattern instances in 30 minutes, not worth it IMO.
Re: Perferated Sheet-How To
Posted: Fri Jul 09, 2021 7:52 am
by sergio.monti
Hi Justin, you can do a big rectangular cut, as big as the perimeter. Then you can add full-length stripes .250" thick in the horizontal and vertical directions. You will end up having A+B instances instead of A*B.
I haven't tested it, so I'm not sure it's going to be faster.
Hope it works.
Sergio
Re: Perferated Sheet-How To
Posted: Fri Jul 09, 2021 8:19 am
by mattpeneguy
Don't reinvent the wheel here. Shaodun Lin posted about this in the old forum, and I'm glad to see he was wise enough to post it elsewhere. You can read about it here:
https://www.linkedin.com/pulse/how-impr ... aodun-lin/
Re: Perferated Sheet-How To
Posted: Fri Jul 09, 2021 8:34 am
by MJuric
Nice post and pretty much what I've stumbled across....without doing the maths

I've always found that the bigger the array the time to do the function seemed to be non linear. So if I had a big array I always looked for a way to break it down into a bunch of smaller ones. Even though you end up with the same number of holes the speed of the file is significantly faster across the board.
As I mentioned above I also remembered do an body array and combine. That seemed to be faster. But when I tried it on this particular pattern it didn't seem any faster and instead seemed slower. Nice to know that there is some magical number that one works better than the other.
Re: Perferated Sheet-How To
Posted: Fri Jul 09, 2021 8:37 am
by SamSpade
We deal with perforated sheet metal on a daily basis, and yes this can be an issue if you truly need to extrude each individual hole. As @MJuric had mentioned we typically show a small portion of the perforation pattern in each corner, eliminating the stress on computing resources.
We perforate in-house, on either a dedicated perforator (a Bruck) or when tooling isn't available on that machine, on a turret punch press. We will indicate the limit of the perforation pattern and the number of steps (instances) in both directions and spacing and the operator does the rest.
Now on parts that are non-rectangular in shape (trapezoidal 'L'-shaped,...), we will again only show the corners of the perforated pattern, but then add each and every hole only onto the DXF file required to produce the part. 2D CAD seems to handle a greater volume of holes without issues (no computer lag).
Re: Perferated Sheet-How To
Posted: Fri Jul 09, 2021 8:47 am
by MJuric
SamSpade wrote: ↑Fri Jul 09, 2021 8:37 am
As @MJuric had mentioned we typically show a small portion of the perforation pattern in each corner, eliminating the stress on computing resources.
This is a carry over from the drawing board. You'd be ushered out the door for drawing in 13,986 3/8 X 3/8 squares :-) Back in those days a whole lot more was done with "Representation" and notes. Today I think we tend to "Over model" because it's WAY easier, but in many cases simply not necessary to have an exact model that will bring your machine to it's knees.
Re: Perferated Sheet-How To
Posted: Fri Jul 09, 2021 8:59 am
by HerrTick
There's a limit to how efficient you can make this model. The sheer quantity of faces and resulting intersections is going to be a burden no matter what.
Good place to use the Freeze Bar.
Re: Perferated Sheet-How To
Posted: Fri Jul 09, 2021 9:20 am
by mike miller
Does this absolutely have to be real geometry or could it be cosmetic? If you have RealView graphics enabled you can use Appearances>Miscellaneous>Pattern (or 3D Textures) which will look quite realistic if the mapping is set correctly.
Your hardware (and future coworkers!) will thank you.
Re: Perferated Sheet-How To
Posted: Fri Jul 09, 2021 9:31 am
by mattpeneguy
mike miller wrote: ↑Fri Jul 09, 2021 9:20 am
Does this absolutely have to be real geometry or could it be cosmetic? If you have RealView graphics enabled you can use Appearances>Miscellaneous>Pattern (or 3D Textures) which will look quite realistic if the mapping is set correctly.
Your hardware (and future coworkers!) will thank you.
Yes! I do this with grid deck. I even have a custom material that gets me the correct weight called 4" grid deck or something like that. This is important for balance for us. So something like this could easily be done for a perforated sheet, if weight and balance is of concern.
Re: Perferated Sheet-How To
Posted: Fri Jul 09, 2021 10:13 am
by matt
Does anybody remember the punchholder? It was a model, I think from Anna Wood, that a lot of us used as a benchmark for SW versions and hardware. It was, among other things, a big pattern.
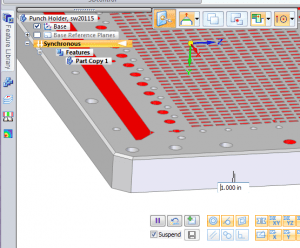
Even then we decided that a note was the best way to handle this. Patterning bodies is a great thing, but if you have to boolean them all back together, it loses its greatness. Geometry pattern works only if all of the pattern instances are exactly the same. You could try the Face Pattern, but that might have the same limitations as geometry pattern.
Here's a link to an old blog post on the topic. It's missing a few images....
https://dezignstuff.com/building-the-punch-holder/
Re: Perferated Sheet-How To
Posted: Fri Jul 09, 2021 10:26 am
by mike miller
matt wrote: ↑Fri Jul 09, 2021 10:13 am
Does anybody remember the punchholder? It was a model, I think from Anna Wood, that a lot of us used as a benchmark for SW versions and hardware. It was, among other things, a big pattern.
Even then we decided that a note was the best way to handle this. Patterning bodies is a great thing, but if you have to boolean them all back together, it loses its greatness. Geometry pattern works only if all of the pattern instances are exactly the same. You could try the Face Pattern, but that might have the same limitations as geometry pattern.
Here's a link to an old blog post on the topic. It's missing a few images....
https://dezignstuff.com/building-the-punch-holder/
Hey matt, could you post those files? For some reason the original links get a "Page not found" error.
Re: Perferated Sheet-How To
Posted: Fri Jul 09, 2021 12:50 pm
by JSculley
mike miller wrote: ↑Fri Jul 09, 2021 10:26 am
Hey matt, could you post those files? For some reason the original links get a "Page not found" error.
You already have the files. They are installed as part of the SOLIDWORKS Rx benchmarking tool:
Re: Perferated Sheet-How To
Posted: Fri Jul 09, 2021 1:41 pm
by matt
mike miller wrote: ↑Fri Jul 09, 2021 10:26 am
Hey matt, could you post those files? For some reason the original links get a "Page not found" error.
The files are about a decade old, and haven't survived some of my site transformations. I might be able to find some versions.
The SE part penetration.par shows the inside sticking through the outside. If you edit it in synch, that fixes itself. SW creates the same error, but last I checked doesn't fix itself on editing.
I couldn't find the SE punchholder part. I must have posted it to the SW Forum, but searching for it in the current site gave me a headache.
Re: Perferated Sheet-How To
Posted: Sun Jul 11, 2021 3:32 pm
by Tom G
This solution seems overlooked. Solve it once and then remove all parametric features by exporting to IGES and reimporting as a dumb body part.
Broadly, my experience shows that the difficulty of messy parts will snowball when carried forward into assemblies and further into drawings.
This works great for stock pieces. You can have a dumb large sheet, and cut it to size. or alter other bodies to it (merge, extend, subtract). This solution is primarily about NOT designing for pattern change. The part is standardized as what will be purchased and implemented.
If you do this for a client that wants to alter the pattern by feedback and revisions, this process will not help you as much. You can, of course, retain the parametric file to later alter and regenerate its new dumb solid. However, it does still isolate the huge resource drain to the limited process of minor component creation, and then subsequent assemblies and drawings which use this will no longer have to solve the pattern.
Re: Perferated Sheet-How To
Posted: Mon Jul 12, 2021 8:13 am
by IndianaDave
Large patterns have been an issue with Solidworks (and probably other CAD software) since the beginnning...
Perforated sheet, expanded metal, etc. aren't necessary to create, unless you need it for the mass.
Even then, you can create a material that has the mass, and it should calculate the weight properly.
One thing I've had to do in the past is create a large vacuum formed part. It held small electric motors, and had draft, and fillets. I think there were 150 cavities... There was no way I could get SW to create them all without killing my machine.
My boss could not understand, because they "Bought the computer that you spec'd"...
I
Re: Perferated Sheet-How To
Posted: Mon Jul 12, 2021 1:03 pm
by JustinP
Thank You so much Matt!!!!
Re: Perferated Sheet-How To
Posted: Mon Jul 12, 2021 3:54 pm
by Austin Schukar
Workaround that I've used (only for square holes).....involves merging two bodies with long slots patterned along the x and y axes.
Create two bodies, one for a vertical pattern, another for horizontal.
Cut one slot, use linear pattern. Repeat like so
Then Combine.
Still somewhat parametric, and this method alone takes around 4 minutes to full rebuild....I'm sure someone could refine this a bit by breaking it up. But this seems to work best for me, in this case.
Re: Perferated Sheet-How To
Posted: Tue Jul 13, 2021 5:31 am
by sergio.monti
sergio.monti wrote: ↑Fri Jul 09, 2021 7:52 am
Hi Justin, you can do a big rectangular cut, as big as the perimeter. Then you can add full-length stripes .250" thick in the horizontal and vertical directions. You will end up having A+B instances instead of A*B.
I haven't tested it, so I'm not sure it's going to be faster.
Hope it works.
Sergio
I tested it with no success, the above method takes longer!!
Re: Perferated Sheet-How To
Posted: Wed Jul 14, 2021 2:09 pm
by JustinP
mike miller wrote: ↑Fri Jul 09, 2021 9:20 am
Does this absolutely have to be real geometry or could it be cosmetic? If you have RealView graphics enabled you can use Appearances>Miscellaneous>Pattern (or 3D Textures) which will look quite realistic if the mapping is set correctly.
Your hardware (and future coworkers!) will thank you.
I believe so, I need a cut pattern to cut the part. I've never expiremented with display or appearance but if you can get a DXF cut file from that point me in the right direction!
Re: Perferated Sheet-How To
Posted: Thu Jul 15, 2021 8:24 am
by IndianaDave
JustinP wrote: ↑Wed Jul 14, 2021 2:09 pm
I believe so, I need a cut pattern to cut the part. I've never expiremented with display or appearance but if you can get a DXF cut file from that point me in the right direction!
You can't...
For material that is purchased (expanded metal, chain link, tread plate, etc) this works fine...
Best option is to model one corner, and make the dxf file, and then pattern it in the dxf file.
Re: Perferated Sheet-How To
Posted: Mon Jul 26, 2021 4:34 pm
by JustinP
Yeah, one of our users has autocad but he really drags his heels. it takes about the same amout of time but less head ache. 3 days to pattern and render or 3 days for moaning over it. Ha.
I have a nother program called pronest that I use. I ened up making a 3/8" square, fliped the lead-in to the inside and nested 20K with the correct spacing for the cut file.
Re: Perferated Sheet-How To
Posted: Wed Jul 28, 2021 9:55 am
by berg_lauritz
This link shows you a nice graph, that depending on the # of instances the rebuild time is different for the two best methods.
There is a whole chapter in
this ebook from cadbooster.com where he shows the difference of rebuild times in it (I know, a shameless plug here).
Edit: I didn't see, that
@mattpeneguy quoted that link already. I only got to know it through the ebook.
Another idea: Do you have to model this as one body? If you i.e. only do the linear pattern in one direction for a body (i.e. x), then combine & pattern this body you'll have long horizontal lines, that could be manually removed before nesting (or by yourself, if you do the .dxf).
This way you have a part, that is decently fast & you can also nest it fairly quick.
In my case this is would save me 52seconds (Combine2) to remove all of those lines for nesting. Plus every time I load a model with this in it.

- Screenshot 2021-07-28 092011.png (9.05 KiB) Viewed 4072 times
Re: Perferated Sheet-How To
Posted: Wed Jul 28, 2021 1:31 pm
by Ry-guy
Just because you can...doesn't mean you should! There are practical limits to everything! What might be logical as one customer of the data will be totally waste for others! Keep that in mind!
My 2 cents. The export as Parasolid and then importing back in and trimming up will be your simpliest and probably most affective solution.
But your drawing views are going to be black blobs and your drawing view render times are going to kill you too!
Way back when in the late 90's we had to do large platform structure for power plants. We had to have CG's and weights for lighting diagrams. Because of this, we had two representations of all the grating pieces and expanded metal steps. 1- the actual designed model and 2- the drawing and lightweight model (a block). The actual models where used for weight calculations and the lightweighted version was used for everything else.
If you needed detail views of the mounting clips and grating pieces we had process to handle that as well!
Ryan